Saturday, 22 February 2014

Keep your sharpie mani from smearing using glue and water

Do u love nail art? If yes, then you must have heard about sharpie manis.....
Even if you are not a nail art lover, you will still love the sharpie manis.
I have tried nail art with acrylic colors and nail art brushes, I have tried stamping nail art and looks like I am now good at sharpie manis too. When I came across sharpie manis on internet I fell in love with the concept instantly.
Here are few sharpie manicures that I love:


I applied the base coat, let it dry and then used my sharpies to create amazing designs. After some time when I applied the top coat. My lovely designs smeared ruthlessly L
I was very disappointed and tried it several times but I always ended up with smeared nails.

When I searched on internet "How to fix sharpie manicures" many of them suggested to use a hair spray.
Woah I loved this quick fix. Unfortunately I dint have hair spray. Little more research and I found out that hair spray creates a thin film of polymers that separates your sharpie art and top coat.
As I dint have a hair spray I wanted a substitute for this.

Glue also contains polymers. As glue is usually sticky I decide to add a tiny amount of glue to water and use it instead of hair spray.
I filled an empty pen sanitizer with this mixture and sprayed it lightly on my nails with sharpie designs. After my nails were completely dry I applied a top coat.

My nail art dint smear at all. This blog post is dedicated to all those people who were disappointed with their first sharpie mani.

I hope you guys loved the post. If yes, then please leave your comments below.

Image source: Image 1
Few images used in this post are found from different sources all over the internet, and are assumed to be in public domain and are displayed under the fair use principle. I provide information on the image's source and author whenever possible, and I will link back to the owner's website wherever applicable.

Saturday, 15 February 2014

Barely nude nail art tutorial

If you are a nail art maniac like I am then you must be trying out a lot of nail art. Novelty nails have been there around for some time but Nude is back with a bang.
Now paint your nails in nude for this summer.

Nude nail polish is easy to wear and no one can tell easily if your nails are chipped.
The key is to find a perfect match to your skin tone.
If your skin tone is medium choose nude nail colors with gold undertones.
If you are a fair skinned beauty try a pinkish nude hue, the lighter the better.

I used the following nail colors:

Base coat: Konad base coat (Missing in the picture)
Nude color: Burnt sienna shade from New U
Metallic: Glazed brown shade from street wear
Top coat: Crystal clear shade from Maybelline color show


First apply a base coat. I used konad nail base coat. Then apply two layers of nude nail color (I applied just one coat because I really wanted it to be nude). Wait till the nail color dries completely before moving to the next step which involves using a tape. Use a regular tape to section off a part of nail (diagonally) that you want to paint in metallic nail color. Now paint over with one coat of metallic and peel the tape off while the polish is still wet. Repeat the same procedure for all the nails.

One of the best ways to enhance a nude manicure is to add a subtle accent. In this case I used one coat of metallic nail polish and a tape. You can stick one or two rhinestones also if you don't have a metallic shade.


The metallic mixed with creamy nude offers a nice play of textures and this muted look is very suitable for workplaces.

I hoped you liked the tutorial. If yes then please show your love by dropping comments below :)

Image source: 1
Few images used in this post are found from different sources all over the internet, and are assumed to be in public domain and are displayed under the fair use principle. I provide information on the image's source and author whenever possible, and I will link back to the owner's website wherever applicable.

Saturday, 8 February 2014

DIY Vitamin E Oil

Vitamin E is an effective antioxidant that prevents cell and tissues from oxidation, which can cause premature aging. Vitamin E is found in many hair and skincare products. You can use these hair and body care products which are readily available, however you can even make your own Vitamin E lotions and oils. I seriously believe Vitamin E oil is a magic potion.


There are multiple uses of Vitamin E oil:

  • Shiny hair
  • After sun moisturizer
  • For hair repair
  • For wrinkles and age spots
  • For skin cancer
  • Eczema and psoriasis
  • Burn wounds
  • Super soft skin
  • Reduces dark circles
  • For chapped lips
  • For dry cuticles
Things you will need to prepare Vitamin E oil:

  • Vitamin E capsules (I used Evion 400)
  • Olive oil
  • Tea spoon
  • Empty bottle (with a dropper if possible)
Procedure:
Take a clean bottle. Preferably dark colored ones. Fill the bottle with 2 and a 1/2 or 3 tsp olive oil. Puncture 3 capsules of Vitamin E oil and mix it in the bottle with the olive oil. Add a drop of lavender or jasmine essential oil for the fragrance. Store the bottle in a cool dark place.
Your own Vitamin E oil is ready. Yes, it is as simple as that.

Before using the oil try to do a patch test to find out if you are sensitive to it. Don't try using the oil directly from Vitamin E capsules because the oil is very sticky and thick in consistency. It is always better to dilute the concentrated Vitamin E oil.

Mix 1 or 2 drops of the prepared Vitamin E oil with your daily moisturizer and see the magic. I use this oil as night cream too. Take a drop of the Vitamin E oil and apply it under your eye on the dark circles. Massage the area lightly with the oil.  

I saw reduced dark circles under my eyes within ten days and I am absolutely in love with this homemade vitamin e oil. Don't apply more than 2 or 3 drops of the homemade Vitamin E oil unless you have dry skin because the excess oil can clog your pores.
It is best to use Vitamin E oil at night because it can be oily and greasy. Replace your night cream with Vitamin E oil.

Now try it and you will love it. 


Sunday, 2 February 2014

RevAyur lip sliders tinted cherry lip balm

I am a lip balm maniac, and here I am to review another lip care product. I am going to review RevAyur lip sliders tinted cherry lip balm.
I bought this from a Medplus beauty store. I loved the concept of a slider and bought it just for its looks without reading any reviews.


Price: 80/- for 7 grams

What does the product promise?
  •  RevAyur cherry lip balm helps keep lips soft and supple.
  •  It soothes chapped lips and gives a glossy appearance.
  • It is long lasting, easy to apply and leaves no waxy after feel.

How to use:
  •          Apply a small amount on lips gently with the finger tips for an even film.
  •          Wear alone for wet shiny look or under lip color.
  •           Apply as and when required

My take on the product:

If you have concentrated so much on the packaging, then why did you place a transparent sheet on the top? I would have loved a plastic transparent piece instead of a transparent sheet. Why am I talking about the packaging so much? Because I believe cute little tins are to be reused. I feel like peeling that tiny sheet.

Yes, the lip balm helps keep lips soft and supple. However I don’t think it does anything to repair chapped lips. The smell of the lip balm doesn’t feel natural. It smells like a cheap fruit candy. I like the smooth texture of the lip balm. And I love the tub with the slider. I play with it J

I use tubs only at home. I carry chap sticks to office because they are travel friendly and easy to apply. I reapply it after every 1 hour. It is not greasy and sticky and gives a subtle red tinted shine to the lips.

Pros:
·         Attractive packaging.
·         Smooth texture.
Cons:
·         Doesn’t repair chapped lips
·         Strong fruity smell.
·         Average staying power.

Over all verdict:
I bought this lipbalm just for the tub. So I dint have any high expectations from the product. If you see I have lot of cons instead of pros. So you can rate the product on your own.

Have you used the product? If yes, then let me know what you think by dropping a comment below J

Saturday, 25 January 2014

Khadi rose and honey herbal moisturizer review

Hello ladies,

I am back with a review of another product from KHADI. I am talking about the Khadi rose and honey herbal moisturizer. Just a month back I decided to switch to SLS free shampoos and paraben free products. In my quest I came across a brand KHADI which is a manufacturer of herbal products. So I gave it a try by buying Khadi travel kit for 180/- I received 2 soaps, a shampoo, face wash, body conditioner and a hair conditioner. All the bottles were of 30 ml size.
As I have never used products from khadi I decided to buy the travel kit so that I can test and then buy the full size products if I like.

Product Description: 
Apply on hands and body after cleansing and washing. Suitable for all skin types. Keeps the skin hydrated through out the day leaving a soft, comforting and lingering fragrance.

Directions: Massage face, neck and nape in an upward motion for at least 2 to 3 minutes. Use twice daily.


Ingredients: Rose Honey, Almond oil, Wheatgerm oil, Jojoba oil and Aloevera.

Price: 130/- for 210 ml. Mine was a 30 ml bottle in the travel kit.

Honestly I like the product. It has a baby pink color and the consistency is neither thick nor too runny. Two to 3 drops are enough to cover a large area. It spreads very easily and it doesn't make your skin oily or greasy. I have a combination type skin and this moisturizer left my skin smooth with a lingering floral fragrance. The smell fades within an hour.
They have added pink color to the moisturizer to go with the name. I found that the color got accumulated on the walls and the bottom of the bottle. I had to shake the bottle 4 to 5 times. So remember to "SHAKE WELL BEFORE USE".

If you are bored of costly moisturizers that contain parabens then you can give it a try. It dint show any harsh reactions on my skin. I feel this moisturizer will be good in summers with normal skin. The fragrance of roses will definitely make you feel fresh :)
It is affordable and contains no harmful chemicals. What else can I ask for?
I am definitely going to repurchase it, however I want to try the jasmine variant too.

Tuesday, 21 January 2014

January 2014 fabbag review

Hello All,

I subscribed for this beauty box in December on their site www.fabbag.com.
I have reviewed the December fabbag Here.
This is my second fabbag and I was waiting for it eagerly. I loved it so much. Thank you fabbag crew :) Now coming to the products I received in this months fabbag.....
 

This months fabbag is called "The Cold Comfort Fabbag". I received all my products in red colored bag. Red is a royal color and they printed "FABBAG" in bold letters in gold. I liked the packaging.

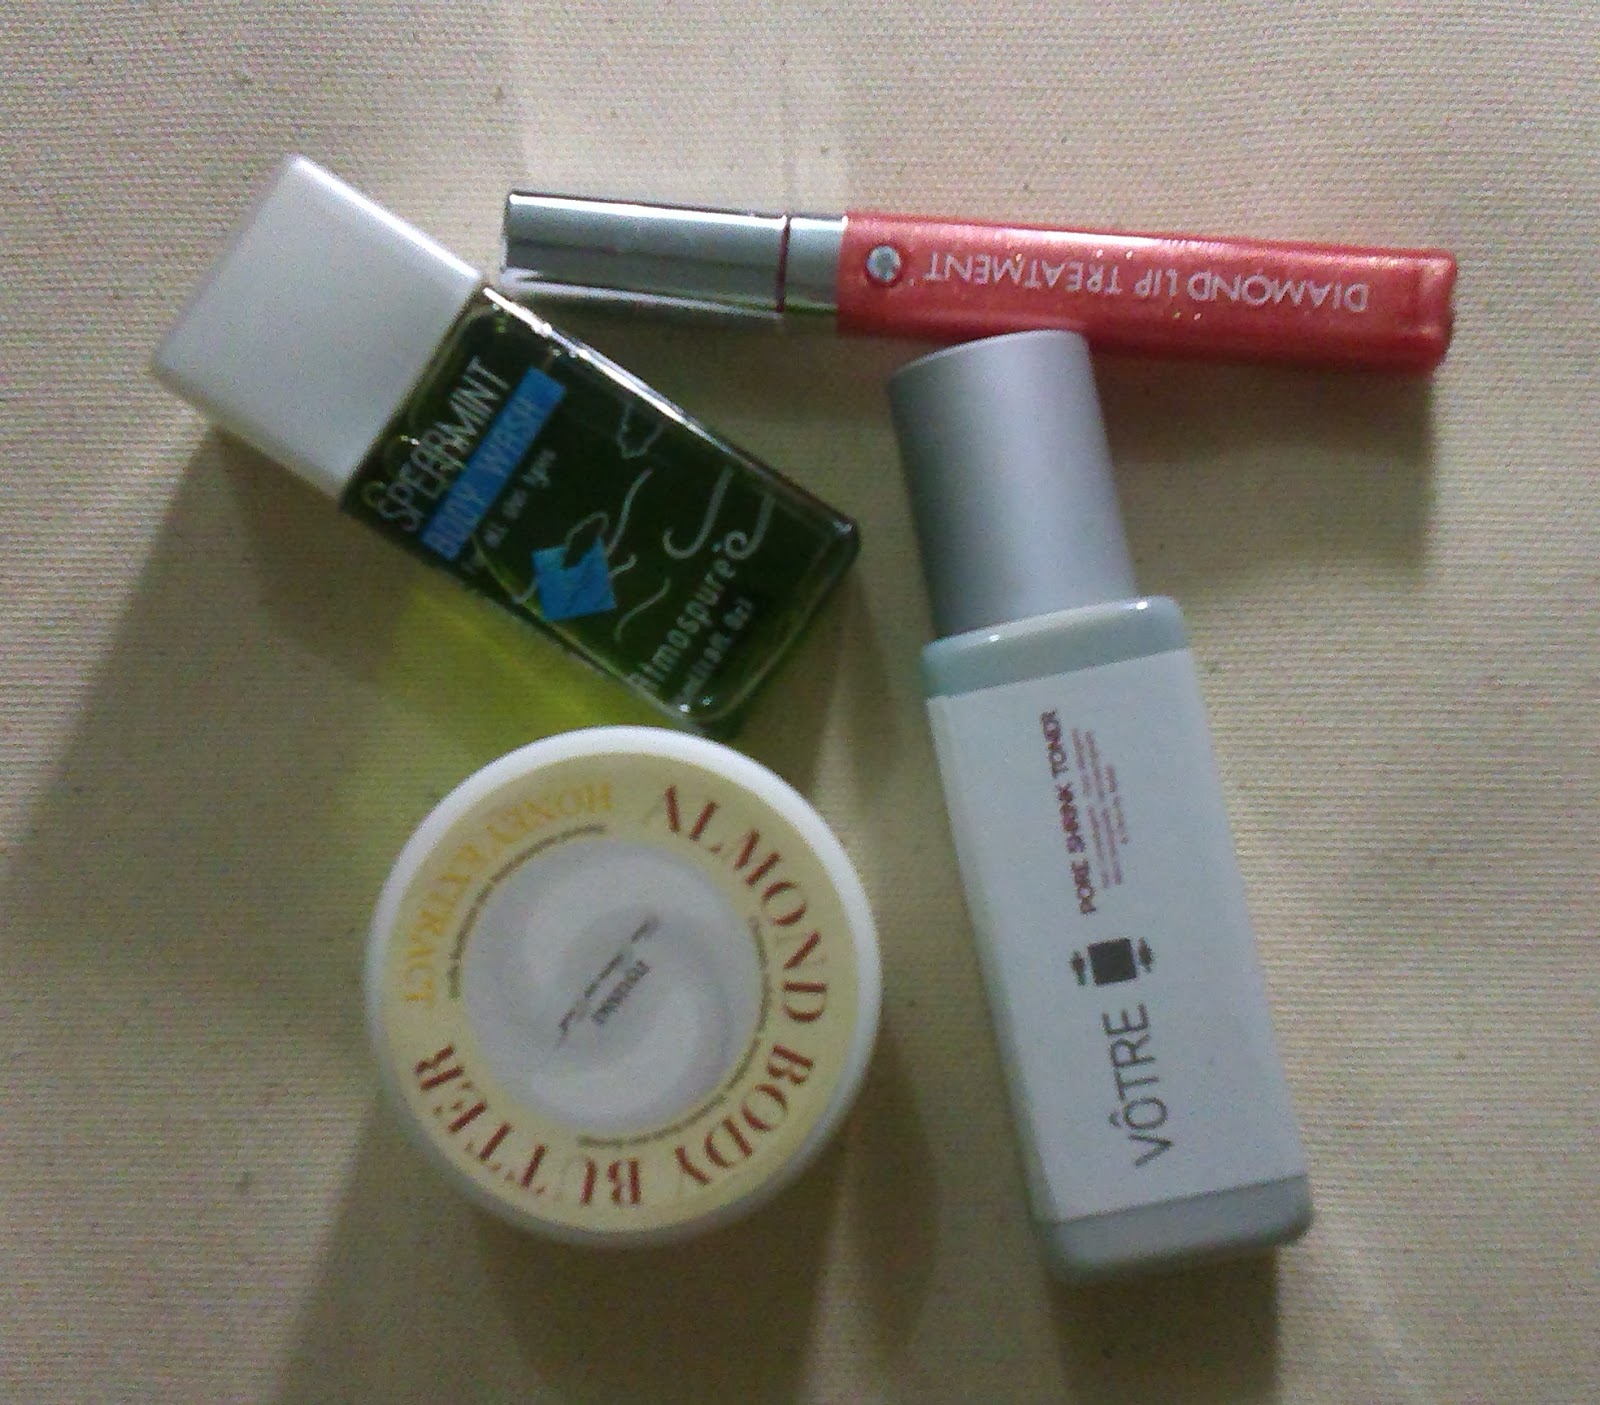
The products I received in my bag are:
  • Salley Hansen Diamond Lip Treatment- Sunrise sunset
  • Nyassa Almond Body Butter
  • Votre Pore shrink toner
  • Bonus: The Natures Co Spearmint Body Wash


2014 calender was printed behind this card which says 'Nothing can stop me from having 365 FAB days this year' :)

Salley Hansen Diamond Lip Treatment - Sunrise Sunset


I use a lot of lip balms and gloss for parties. This gloss from Sally Hansen is just perfect for any occasion. I loved the color. I wish I got "Antique Bronze" shade in my bag. It has lot a lot shimmery glitter particles. I received Full size product in"Sunrise Sunset" shade. The actual cost of this gloss is 575/- for 6.2 gms.

Nyassa Almond Body Butter:


I had mixed feelings when I saw Almond body butter from Nyassa. I was happy because it is a skin care product and I love them. I was disappointed because I just bought Body butters from "The body shop" worth 1265/- I wish they provided me with this body butter in my Dec fabbag. I like the mild smell of this body butter. I received a 50 ml sample, and the cost of the full size product (100 ml) is 600/-

Votre Pore Shrink Toner:


Now I received this on the right time. I have been searching for a pore shrink toner but I found them really costly and I was also reading a lot of reviews. I have not used any products from the brand Votre and I am looking forward to use it. I received a 50 ml sample in my bag and the cost of the full size product (100 ml) is 360/-

The Natures Co Spearmint Body Wash:


I received Lavender Body Lotion from Natures Co in my December fabbag and I liked it. The spearmint body wash is in green color.I dint like the smell of this Body Wash. It had a strong minty smell, VERY STRONG smell. I don't think people will like the smell. I received a 35 ml bottle and the full size body wash (100 gms) will cost you 988/-


I also got a coupon to renew my subscription. What I dint understand is If I have subscribed for a 3 month subscription in December 2013, they sent me a subscription renewal coupon in my 2nd subscription saying this is the last bag for subscription, what about my 3rd fabbag? I will have to talk to the customer care about it.

Overall verdict:
I liked all the products in January month fabbag and I am going to use all of them. I will review all these products individually again. My three month subscription will end next month and I am eagerly waiting for my February fabbag too.

Friday, 10 January 2014

I am crazy lip balm lady and I buy them very frequently. I don't finish the existing ones but new ones just keep coming :D
Today I am going to review the VLCC honey lip balm.
I picked up this product mainly because of its looks and price. I prefer chap sticks which we can twist up easily than the tubs. Why? Chap sticks are much easier to use and you don't have to clean your greasy hands after application of the lip balm.


Price: 49/- for 4 grams

What the product claims:

  • The moisture rich formula soothes and conditions lips to keep them soft and supple.
  • SPF 15 protects from harmful effects of sun.
  • Light non greasy formula, provides long lasting moisture leaving the lips supple and hydrated.
Now I agree with the first point because even normal Vaseline does the same job it keeps my lips soft and supple. SPF 15 is a good thing. However I don't know how to test if it really protects my lips from harmful effects of sun.
I totally disagree with the 3rd point. It is damn greasy. When I used it the first time I felt a block of petroleum jelly is melting on my lips. Seriously it is super greasy. Lip balms are supposed to be smooth and you should get nice feeling with just one swipe across your lips. When I glided it over my lips I felt I am rubbing my lips with granular particles.
It doesn't smell like honey but it smells like caramel. Still the smell reminds of sweet so I don't have a problem with the smell. It is a non tinted chap stick and I like non tinted lip balms because I think these are better for daily use. I had to reapply the balm with in 1 hour of application. I cant leave my work place every few minutes just to apply lip balm.

Pros:
Less expensive.
Travel friendly.
Nice smell.
SPF 15.
Keeps lips soft and supple
Non tinted.

Cons:
Bad staying power.
Texture was bad.
Super greasy.

Overall verdict:
I never found a chap stick at this low cost. If you are a budget freak go for it, you will not complain. I personally like VLCC lip balm tubs.

Have you used this product? If yes, What do you think about it? Let me know by dropping a comment below :)